Is Your Blog Losing Money?

Is Your Blog Losing Money?
Discover exactly how to build a business, not just a blog!
Showing posts with label Easy Garden. Show all posts

Tuesday, April 03, 2007

Mini Garden - Terraria (Terrarium)

According to dictionary.com terraria is "a small enclosure or closed container in which selected living plants and sometimes small land animals, such as turtles and lizards, are kept and observed."

If you are a busy or lazy plant lover, terrarium is a perfect way of keeping some live plants in your home. Miniature garden in glass container or bowl looks very decorative and requires no fuss the regular plants in potting soil do. Just remember to water every once in a while and take care of flowers that grow too big or die.

The lowest maintenance kinds of mini garden are the tall, lidless ones. Plant growth is slower in them. Another choice is the glass container with a lid which makes a stylish centerpiece on your coffee table. Just remember to clean the algae buildup from the glass when it appears.

The most decorous terrariums are the ones designed on a certain theme: bottom of the ocean, ancient civilization, mini landscape etc. If you decide to create one by yourself, don't forget to put some pebbles or aquarium charcoal on the bottom first or your plants might start rotting in standing water. Small orchids, begonias and air plants are excellent choice of species for glass environment.

If not, the comfortable, easy way is to purchase terraria in a specialized store. Then, all you need to do is -- to pick a perfect spot and enjoy watching this wondrous mini nature for months... until some rearranging is needed.

Copyright © 2007 by Daria Perse. All rights reserved.

Monday, April 02, 2007

Easy Garden - Sunflower Spacing

Easy Garden - Sunflower Spacing

Seed spacing is important for several reasons. Whenever we are trying to achieve the best performance of a certain plant, the best way to go (before starting the seeds) is to check and use the instructions on the seed packages. They will usually tell you the exact perfect distances between the seeds and plants.

Reason #1: Every plant needs plenty of room to grow, sunflowers especially. If their seeds are planted too close together, they won't reach their full potential. Their heads will be smaller. The cut flower growers use that to their advantage. They want to grow petite blooms that are not too heavy; therefore they crowd the plants closer together. But when you grow sunflowers in your garden, give them extra space. They will thank you by growing the biggest and most beautiful blooms possible.

Reason #2: Sunflowers that are spaced correctly are much easier to maintain. Every single plant will be easy-accessible, which means easy weeding, watering, fertilizing and pruning. About once a week cut the spent flowers from the poly-headed sunflower species. That will promote more blooming. Also, plenty of space means abundance of sunshine for each plant. When lacking sun, sunflower stems grow frail; they might even collapse in effort to reach for the sun.

Reason #3: The roots of sunflowers excrete toxin (not harmful to humans and pets) that prevents seeds from sprouting and seedlings from growing. The toxin is biodegradable but in the growing season it just might affect another sunflower shoot when planted too close together.

Sunflowers are easy to grow and not fussy about the soil. Just give them plenty of space, sun and good drainage and you'll be able to enjoy their happy faces throughout the season.

Copyright © 2007 by Daria Perse. All rights reserved.

Tuesday, October 24, 2006

Easy Garden: Propagate Rosemary (Rosmarinus officinalis) - 3 Easy Ways

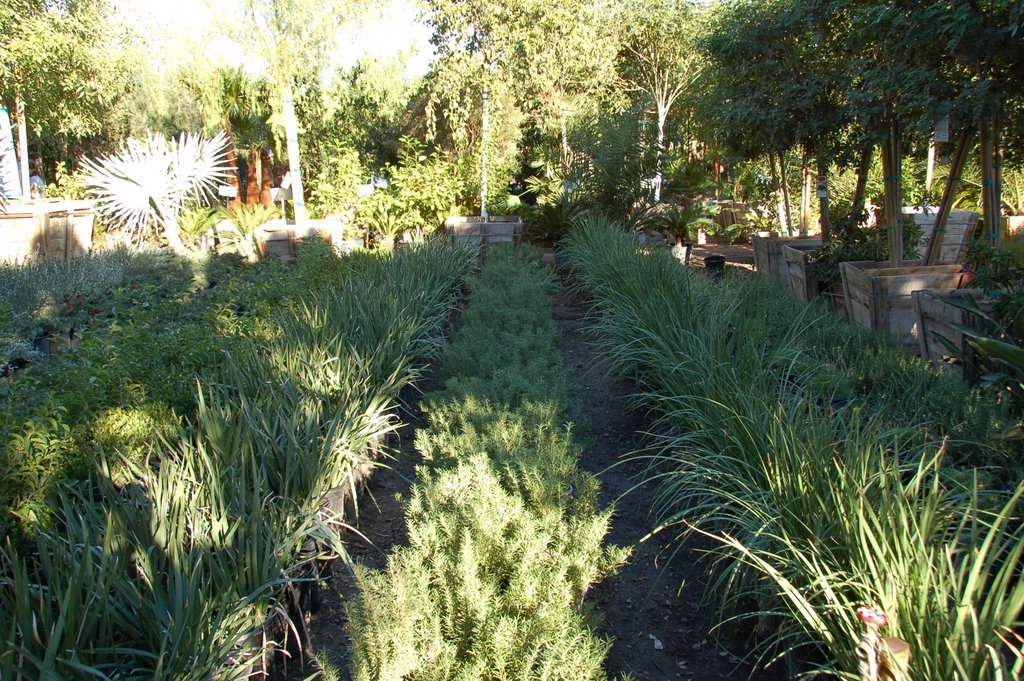
This perennial is easy to grow in full sun and well drained, light soil. Three ways to propagate rosemary are: from seeds, from cuttings and by layering.

1. From seeds: germination of the rosemary seeds is extremely slow and so is the growing of the tiny seedlings. That’s why this is the least favorite of the three choices. Although, if you have patience and want to try and grow your own seedlings or test different species of Rosmarinus, go ahead and give it a try. Just make sure you follow the instructions on the package.

2. From stem cuttings: cut the soft wood at the tip of the branch (2 to 6 inches long). Remember that shorter cuttings mean more compact plants. There are two more basic rules that should not be ignored: use a clean, sharp knife to cut and the mildest strength hormone rooting powder for softwood cuttings (if any). The material for rooting should be sterile (perlite, washed sand, powdered styrofoam, vermiculite, or a mixture of any of those in equal proportions). Do not pack the material tightly around the stems to prevent damaging during removal of the rooted cuttings. Before planting the cuttings, strip at least half of the leaves from the stem. Insert into a rooting material about half stem deep, angled at about 45 degrees.

3. Simple layering: is the simplest way of propagation with rosemary. It almost never fails. Simply choose the branch that will bend easily to touch the ground. Dig a small hole and press the branch in it. Fill the depression with soil and firm well. To keep the branch in place and preventing the new roots from being lifted out of the ground put the rock or a brick over the buried branch spot. See the photo at: http://www.thesunflowergardens.com/page/page/3768454.htm/ Water well. Six to eight weeks later your new plant should have enough roots for the attachment to the parent plant to be cut. Young rosemary is now ready to be transplanted to a new spot.

In a warm, sunny climate your rosemary will grow fast and year round. You will have plenty for flavor in the kitchen as well as aboundance of cuttings to put it in the vase and have that naturally fresh and clean smell in your home.

Monday, October 23, 2006

Herbs: Her Majesty - The Rosemary (Rosmarinus officinalis)

To me, rosemary is mostly about memories. Its distinctive smell teleports me straight to the ranch-type, yellow painted vacation home with the rosemary hedge around on the beach. All that is far away and far back in the past of my childhood. But without a mistake, this time travel happens to me every time I slide my hand over the rosemary bush in front of my house. The magical smell fills up my nostrils and the pleasure of innocent childhood happiness starts rising in my body…

Not only is the aroma, rosemary’s taste is also distinguishing. That’s a good reason to be conservative whenever using it as a spice. A fresh sprig of rosemary makes a nice decoration with many foods, especially fish. Just don’t try to put it in your mouth and chew on it.

Some sources mention the use of rosemary essential oil as a cure for stomachaches and to stimulate the blood circulation. Other natural healing uses: eyestrain, for shiny dark hair, headache, as cellulite eliminator, as pain relief. Only, I’m not a doctor and can’t prescribe you anything.

For now, plant rosemary in a sunny spot somewhere around your home. It will also grow in a pot. Rosemary plants prefer fertile, well drained soil. Different kinds of rosemary are hardy in different zones. If you’re not sure, bring it in the house before freezing. In case you have several plants, leave one or two established plants outside and see if they survive.

Rosemary twigs look great in vases (see the pictures at: www.TheSunflowerGardens.com) plus, they make the inside of your home smell fresh. Every rosemary bush can be pruned to a desired shape. Another attribute of rosemary’s aroma is - it keeps the rodents away!

As soon as I’m done typing this article, I’m going out. There’s a rosemary bush in front of our house. In less than two years it grew from a tiny plant from the nursery to the size of about a yard across. I’m going to brush the top with my hand, close my eyes and spend a few moments on a beautiful distant beach…

Wednesday, October 18, 2006

Easy Garden Tips: Plants in Pots and Burning Heat

If you’re a user (and a fan) of regular pots, planters, containers or window boxes (instead of self-watering ones), here’s a useful tip, custom made for your needs. How to get your beloved plants through the hottest weeks of the summer -- safely and successfully, is probably one of your main concerns.

It’s getting harder and harder to keep the container plants from wilting or dying out in the burning heat of the hottest summer days. Did you try different things to improve the matter but nothing really worked both ways (for good drainage as well as for keeping the moisture in the soil)? So did I. In Southern Florida, nothing seemed to be effective enough.
Containers along the driveway and in sunny front of the house need the most water. One just can’t water enough!

Ice cubes work well (instead of watering). They melt slowly and really soak the soil (while the water quickly runs through, leaving the roots thirsty still). The problem is that for a lot of pots you need a lot of ice…
Packing peanuts at the bottom of the container work great for too much rain or watering. They also make the large planters easier to move since they are light weight. But at the same time, after only a few months, the growing plants don’t have enough soil any more and the roots caught in the peanut-layer start drying out.

Rocks or pebbles at the bottom of planters don’t do anything good for the weight of the planters, especially not the bigger ones. They work for drainage, but do nothing to keep moisture in the soil.

Color of the pots is quite significant. Avoid black containers whenever possible. In the heat of the summer they consume the heat much more effectively than the light-colored planters. That just dries out the soil even faster (and overheats the roots).

Mulch and compost work sufficiently for keeping away the weeds and preserving the moisture in flower beds and not that much in planters.
So, what’s the solution?

It’s either slaving away watering twice a day, give all the plants away and forget container gardening, or find something that would actually work.
I found an answer more by accident. One day I picked up a bag of sphagnum moss to block the drains from washing the soil out of the pot. While planting, an idea crossed my mind. I filled the big containers up to one fourth to one third of the height with the sphagnum moss instead of soil.

Months later, I am very happy with the results. The drainage is still good. The pots are lighter when I’m carrying them from place to place. At the same time, I’m not watering twice a day anymore. The sphagnum moss keeps the soil moist enough for a few days instead! And the best of all: my plants are growing and flowering like never before!

Note: This article is a result of my personal experiences; no scientific research backs it up. Your results may vary.

Monday, October 09, 2006

Environment: Ways to Recycle Water in Your Kitchen


Water is getting scarce, especially the clean, drinking one. Pollution and extreme weather conditions don’t help to improve the matter in any way.


Recycling is a great way to protect the environment. It’s not always simple, though. Some cities and towns collect only certain kinds of recyclable materials and we have to change our "trashing habits" to "recycling habits" when handling empty packaging.


Here is and idea about how to use the recycled water straight from the kitchen sinks - for all you gardeners out there. With almost no effort we can catch and reuse some of the water we exploit in our homes on a daily basis.


All the lucky home keepers who hand-wash the dishes, you can have plenty watering liquid by collecting the rinsing water (while rinsing the dishes). Even if you use the dish washer, you still wash your hands - most likely pretty often and that’s the kind of water that can be used for watering also. Just put a plastic bowl in a sink.


Before using the collected water for watering, make sure it is not greasy. Add a few drops of lemon dish soap or even better, a few drops of baby shampoo to the water. This will not harm the plants but will protect the nature. A drop of fat ruins many drops of drinking water.


One more way to increase the savings is to catch rain water. Unfortunately, you can only do that if you live in a house.


Earth is the only planet available to the human race for living our lives right now. Whatever damage we cause today, our children will inherit the consequences. Every environmentally conscious act makes a positive difference. Contribute your good deed today!

Friday, September 29, 2006

Simple Living Guide: Plant your Plants in the Cheapest Planters on the Planet


Here’s the thing: I honestly can’t get out of my skin and have to be practical all the time. It must be a curse or something... Not being able to stay away from the flowers and herbs and veggies, I keep running out of planters over and over again. Unfortunately, the nearest store is not right across the street and as it’s really urgent to plant some new seeds I’ve just received in the mail (now!), I am forced to use my creativity.

First I realized how any kind of basket, made out of natural material is a great looking and useful planter. You probably have some around the house and have nothing to put in. Try to turn them into pots. Protect the inside with a plastic shopping bag (cut away the access on the top and punch a couple of holes in the bottom), fill up with potting soil and you have a new planter.

If the plastic bag showing around the rim of the basket bothers you, there’s an easy solution for that as well. Spread any kind of moss as mulch around the plant and your planter will have a perfectly natural, unique look. Rocks or pebbles make a nice (concealing) decoration, too. Besides, dollar stores are a rich source of the baskets of all sizes, shapes and materials.

On another occasion I needed considerably bigger container to plant some kind of a vegetable that grows roots deeply. Looking around desperately for something that could serve the purpose, my eye caught a styrofoam packaging from the meat I ordered online a little while ago. That was one happy discovery for me! With the small screwdriver I poked a few holes in the bottom and my perfect-size-container was ready to become a new home for my mini garden.

The third thing that’s probably lying around your storage room or basement is a styrofoam cooler. That one also makes a great planter. The big ones are large enough for planting a bush with some ground cover flowers around. Be careful when moving it from place to place, though. They break easily if you squish them from the side too much.

All three kinds of cheap (or free) planters described above should last at least a couple of seasons if you treat them right. If you don’t like the look of styrofoam, put this kind of container behind a nicer one or plant some hanging plants around the edges and your gardening success and happiness are (almost) guaranteed!